If you’re looking to capture some amazing trail running photos just like the Pros do, then you need to be prepared. Luckily, here are 10 Tips For Photographing Trail Running in Style that will get you started.
1: Get out of bed.
I know it’s a strange first bullet point, but it has to be said, so let’s get it out of the way so that we can all move on with our day. If you are neatly tucked up under a warm and cozy duvet then you arent outside taking the kind of photos that Red Bull will be banging your door down to buy from you. So get up, get out and get shooting. No complaints, no moaning, just go. Remember, you don’t have to do this, you get to do it.
2. Get Fit!
It’s all well and good trying to photograph someone running, but if you yourself aren’t fit enough to move big distances quickly then you will be very limited in what you can shoot and where you can go!
Running trails can be very challenging, so make sure you’re up to the challenge before hitting the single track. Adventure sports often take place in remote locations over very difficult terrain. Being physically fit allows top photographers to slog up to the best vantage points and carry their heavy camera gear without becoming exhausted.
Days can be very long when you are slumped in an exhausted heap on the side of a trail.
3. What camera should I use?
A decent entry-level camera can do the job of shooting sports photography. While a top-end DSLR or mirrorless camera may have more advanced features and better image quality, a good entry-level camera will still be able to produce quality images. Entry-level cameras may have limitations in terms of speed and low-light performance, but they are still capable of capturing sports action.
4. DSLR or Mirrorless?
This is an argument we wouldn’t have been having even 10 years ago but mirrorless cameras are taking the world by storm and soon camera manufacturers will stop making the ubiquitous DSLR altogether.
The main difference between a DSLR and a mirrorless camera is that the DSLR uses a mirror to project the image onto the viewfinder giving you an optical view of the scene in front of the camera, while a mirrorless camera uses an electronic viewfinder (EVF). The EVF gives an accurate depiction of exactly what the photo will look like when you hit the shutter. This ‘What you see is what you get’ ability of mirrorless cameras is what makes them the perfect tool for sports photography. The mirrorless camera is also much lighter, more compact, and has faster autofocus than the old-school DSLR.
5. Is the lens really that important?
A decent-quality lens will make a much bigger impact on image quality than any upgrade you make to your camera body because the lens is the primary factor in determining how sharp and detailed an image is. The lens is responsible for the amount of light that enters the camera, the depth of field, and the angle of view, all of which affect the overall image quality. A good quality lens can help to minimize distortion and aberrations and produce sharper, more detailed images. In contrast, an upgraded camera body may have a higher resolution and improved processing power, but it does not affect the quality of the image anywhere near as much as a good lens does.
6. Carry a selection of lenses but not too many.
When I started out shooting sports, I would often carry 4 or 5 lenses with me to ensure that I had the right lens for any situation. This was often a cumbersome task, as the lenses added a lot of extra weight to my gear. Additionally, I was often shooting in dusty or windy environments, and changing lenses in those environments opened up a risk of getting dust and other particles onto the camera sensor.
To reduce the weight I was carrying I began to carry fewer lenses with me and nowadays more often than not I only bring the two lenses that I know are essential for the particular shoot I am doing and occasionally I’ll add a lightweight fisheye lens into the mix when I know I’ll be shooting in tight spaces.
The main reason you would only carry a combination of a wide angle and a zoom lens is that they are the two most versatile lenses and can be used in a variety of situations. You really won’t have time to be doing much lens changing on the side of the trail. You are either moving or shooting.
A long lens is going to be your best friend when shooting trail running photos. This will allow you to capture close-up shots of your subject without having to be right next to them. A 70-200mm lens is perfect for our purposes and if you can stomach the extra weight, a 100-400mm is often even better.
Conversely, a lot of times, a wide-angle lens is going to be the lens of choice. This is because it can help you capture the vastness of the landscape and place the runner into context within it. Just be careful not to get too close to the runner, as a wide-angle lens will tend to distort their features.
7. The Angle of Dangle
You will often hear that the best advice for capturing a great action photo is to ‘get close and get low’. It’s very good advice.
Shooting from a low angle can give the illusion of speed and make your subject look more powerful. Conversely, shooting from a high angle can make your subject look small and insignificant. It all depends on the look you’re going for.
Shooting from up close is closely linked to shooting from down low. This might seem like a no-brainer, but it’s worth mentioning. If you want to get great shots of the runner, you need to be close to the action. This means getting off the sidelines and getting into the thick of things. Just be careful not to get in the way!
8. Use A Fast Shutter Speed. Or use a slow shutter speed. Whatever.
If you want to freeze the motion of a runner, then you need to use a fast shutter speed. The faster the shutter speed, the more motion will be frozen in the image. Generally, a shutter speed of 1/1000 or faster is recommended for freezing motion. You may also need to adjust the ISO and aperture settings to accommodate the higher shutter speed. For example, in broad daylight, a camera set at 1/1000 shutter speed, and f/4 aperture should be sufficient for freezing the motion of a runner.
When shooting in poor lighting, the ISO needs to be increased in order to capture enough light while keeping the shutter speed high. Increasing the ISO will allow the camera to collect more light, but it will also increase the amount of noise in the image.
For example, in poor lighting, if the shutter speed is 1/1000 sec and the f-stop is 4, then the ISO could be set higher to accommodate the lack of light and this would result in a brighter image, but it would also create more image noise. Alternatively, the ISO could be set lower for a less noisy image, but the photo will be darker.
Modern cameras can easily shoot at an ISO of 16800.
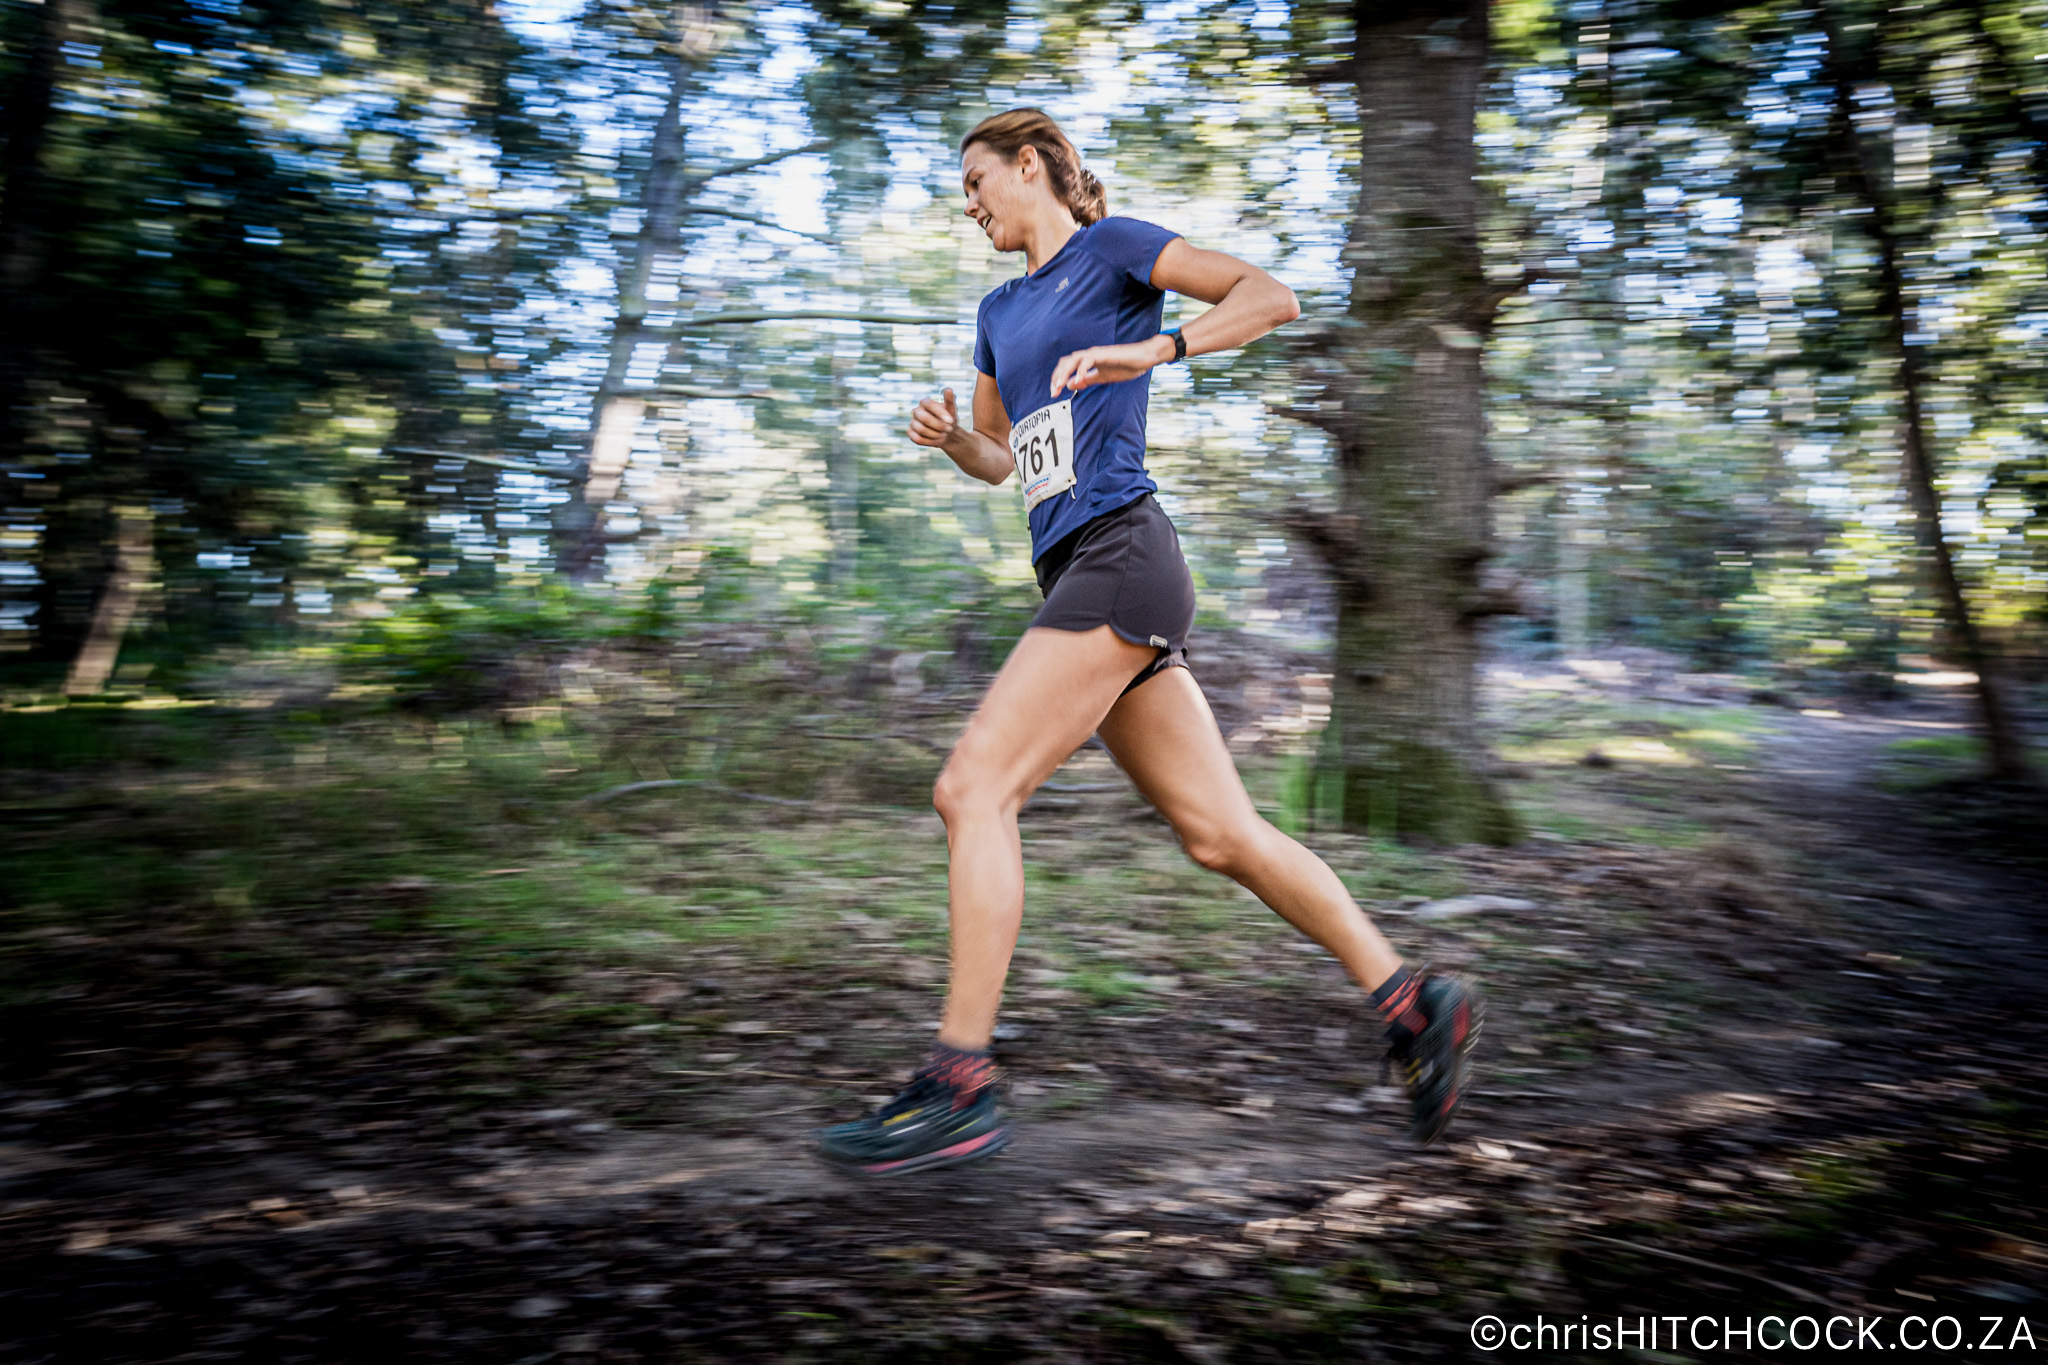
A slow shutter speed is needed to create a panning shot that can be used to give an illusion of speed by blurring the background while keeping the subject in focus. This technique produces a dynamic and energetic look to a photo as if the subject is moving quickly. When setting up for this shot, the photographer should use a slow shutter speed (usually between 1/15 and 1/60 of a second) and pan their camera with the subject as they take the photo. This will result in a sharp subject against a blurred background, conveying a sense of motion and speed. It’s a technique that requires a fair amount of practice and even pros will only get a hit rate of 10-15% useable shots.
9. Be Ready For Action
When shooting trail running, you need to be prepared for anything…
It is essential to always have the camera turned on and that it is ready to shoot in case an athlete suddenly appears. (The first runner tends to materialise without warning just 2 meters in front of you.)When you are being paid to shoot a race it is important to capture the lead male and female runners for the event press releases. Having your camera turned on and ready to shoot allows you to react quickly and capture the moment without having to fumble around with settings or wait for the camera to power up. This ensures that you don’t get that most embarrassing of shots, the back of a disappearing runner.
10: Be aware of your environment
One of two things is almost always happening. Either you are damaging the environment or the environment is trying to damage you. When you are up on a mountain shooting runners or mountain bikes coming past you, then you are not on the trail but next to it. If you are in fact on the trail then get off it, it belongs to the runners and you should be doing everything in your power not to annoy them. Be aware that when you are off-piste you are probably trampling some very sensitive fynbos or indigenous vegetation into oblivion. Tread lightly, we want to be allowed to go back there next year. Conversely, always be supremely aware that you are tramping around the home ground of things that can kill you in very nasty ways. Things like snakes, zebra, leopards, and a host of smaller creepy crawlies can all turn your lovely day on the trail into a nightmare. Oh, and beware of that 20-meter cliff face just behind you that’s totally hidden by the ferns.


1 Comment